
Woodworking is one of those hobbies where the right hand tools make all the difference. There’s just something satisfying about shaping wood with your own hands. Whether you’re building furniture, crafting small keepsakes, or tackling household repairs, a handful of tools help you get smooth, precise results and avoid most common frustrations.
After years in my garage shop, I’ve settled on ten hand tools every woodworker should have nearby. These aren’t just for experts; they’re the base for almost any project.
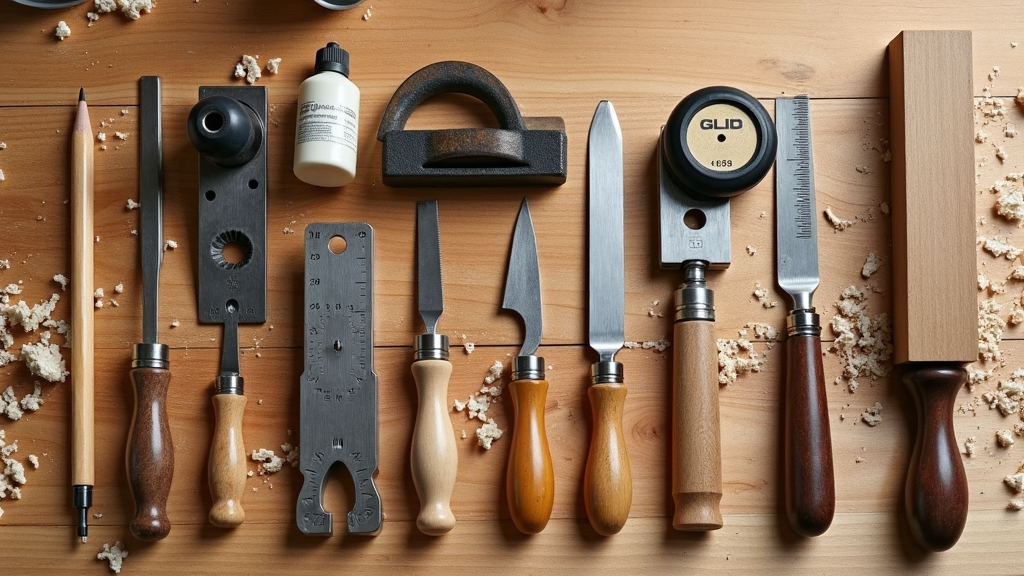
Here’s my list of ten woodworking tools I always reach for, along with why they’re handy and practical tips on using them.
1. Block Plane: Smooth Surfaces, Perfect Fits
The block plane is my go-to for all sorts of smoothing and shaping tasks. It trims end grain, eases sharp edges, and levels small imperfections on wood surfaces. Even if you have power tools, nothing beats the feel and control of a sharp block plane for quick touch-ups or fitting joinery.
When shopping for a block plane, look for one with a comfortable grip and easy blade adjustment. Keep the blade extra sharp and, before you know it, planing will become one of your favorite parts of the job.
Seasoned woodworkers also use a block plane for fine-tuning the fit of doors, drawers, and panels. If you find yourself sanding too much to adjust a part, try using the block plane instead for more control and a smoother finish. As you gain confidence, you’ll start to spot where a plane can save time and make your projects look a step above the rest.
2. Tape Measure: Consistency from Start to Finish
Accurate measuring is the start of any successful project. A high-quality tape measure is something I always keep clipped to my belt. Choose one that locks easily and has markings you can actually read at a glance. Bonus points if you find one with decimal markings for smaller projects.
Stick with a 16′ or 25′ tape for most woodshop work. Anything longer feels bulky, and anything shorter always comes up just short on sheet goods or lumber. Retract it gently to avoid tape slap, and you’ll keep your tape in better shape this way.
Some tapes include magnetic hooks, handy for working solo or stretching across long boards. If precision matters for you, look for a tape with strong contrast and fine increments—you’ll thank yourself when laying out joinery or trim work.
3. Square: Stay on the Straight and Narrow
A carpenter’s square is totally worth having, but a smaller, solid try square or combination square is even more useful for woodworking. It helps check that your cuts are at a true 90 degrees, lays out accurate lines, and checks inside corners and joints for squareness. I use mine all the time for setup, layout, and quick checks during assembly.
- Speed square: Great for quick marking and measuring angles.
- Combination square: Super versatile for marking, measuring, and finding depths.
Keeping your work square is something that saves time, and prevents frustration and extra fix-it work down the road.
4. Mechanical Pencil (Drafting Pencil): For Crisp, Precise Layouts
A mechanical pencil, especially the drafting kind, lets you mark wood cleanly and precisely. Unlike regular pencils, a mechanical pencil always stays sharp and doesn’t make a fat fuzzy line. This makes it easier to get your cuts or joints exactly where you want them, especially for fine work like dovetails or inlays.
I go for a 0.5 mm or 0.7 mm lead. Choose a pencil with a comfortable grip and replaceable erasers. Keep a few refills handy. Pencils seem to vanish just when you really need them—having a spare in your apron or toolbox keeps you moving forward.
5. Marking Knife: Layout Lines That Matter
Where a pencil line gets lost in sawdust, a marking knife cuts a crisp groove right into the wood. It’s super important when you’re working with hardwoods or making precise joints, since the knife leaves a line that guides saws and chisels more accurately. Plus, it helps prevent wood fibers from tearing out along your cuts.
A marking knife is a small investment that pays off with neater, sharper fits. If you haven’t tried one yet, you might feel surprised how much cleaner your work looks. When paired with a good square, you can break out perfect layout lines every time—giving your joinery that next-level cool, professional look.
6. Protractor: Perfect Angles Every Time
There’s a lot more to woodworking than just 90 degree cuts. A sturdy protractor helps you lay out and check all sorts of angles accurately. I use mine when making miters, laying out legs on furniture, or adding decorative details that need to match up just right.
The ability to measure and transfer angles is especially handy if you’re customizing your work or repairing old furniture. Since nothing is ever perfectly square in those situations, having a reliable protractor saves you the trouble of extra measuring and guesswork. Look for a metal protractor with etched numbers, as these last longer and keep their accuracy for years.
7. Glue Bottle: For Easy Glueups
Gluing up joints is half the battle in woodworking. Having a glue bottle that keeps glue flowing evenly without a mess is a small but underrated upgrade. I like squeeze bottles with a fine tip for precise application. They’re perfect for getting glue into tight dadoes, rabbets, and mortises without dripping everywhere.
Wash the nozzle after each session so you have fewer clogs and sticky surprises on your bench. Or wait till it dries and enjoy the satifying feel of peeling off dry glue. I know you like it.
8. Sanding Block: For Smooth, Even Surfaces
Hand sanding has the reputation of being slow, but a quality sanding block makes a world of difference in speed and finish. It keeps sandpaper flat so you don’t round over edges, and helps you even out surfaces much better than folding sandpaper by hand.
Best of all the sanding blocks are perfect for rounding over your edges. This avoids chipping the edge of melamine, MDF, or plywood.
9. Chisels: All Purpose Shaping and Detail Work
Wood chisels handle everything from cleaning up joints to carving intricate details. A basic set with sizes around 1/4”, 1/2”, and 1” covers almost any task. Sharpness is key. Dull chisels are frustrating and much less safe.
Keep your chisels sharp and store them where the edges won’t get dinged. I use mine for trimming joinery, removing glue lines, and even for small repairs around the shop. Over time, you’ll get to know which widths you reach for most and add to your set as needed.
10. Clamps: The Extra Set of Hands
There’s a saying in the woodworking world—you can never have too many clamps. I totally agree. Clamps hold your work steady for gluing, assembly, and finishing, freeing your hands to check fit or make adjustments without worrying about things shifting.
- Bar clamps: Great for edge gluing bigger pieces like panels or table legs.
- Spring clamps: Handy for tacking on small bits and holding odd shapes.
- F style clamps: Quick for most small assemblies.
Start with a couple of each type and add more as you take on bigger projects. Your tasks move faster, and everything comes out a lot neater. Clamps are one of those things you never regret buying—you’ll use them for far more than woodworking too.
Tips for Building Out Your Hand Tool Kit
When shopping for new tools, quality matters more than quantity. Pick tools that feel comfortable in your hand and that you’ll enjoy using often. I like to buy the best I can afford in the most important categories, then add special tools as your needs change or your skill grows.
If possible, check out tools in person before buying. Some woodworking retailers and hardware stores let you try out tools or answer questions. Watching online videos or asking friends in woodworking forums can help you find good value and real-life performance tips.
Resist the urge to buy every eye-catching tool you see. Focus on building your skill with the basics. Over time, you’ll stumble upon niche tools that truly speed up your workflow or help tackle special tasks. When that happens, you’ll feel confident about adding them to your kit.
Getting More Out of Every Tool
Learning to use your tools well is just as important as owning good ones. Take time to learn proper sharpening techniques, how to read grain direction, and how to set up for different tasks. A little practice with layout, measuring, and dry fitting parts gives you smoother results and fewer mistakes.
Of course, everyone’s favorite tools end up being a bit different after a while. But with these ten basics, you’ll be ready for just about anything a woodworking project throws at you. Stick with your core kit, add to it slowly, and you’ll find your woodworking projects come out cleaner and more enjoyable every time.